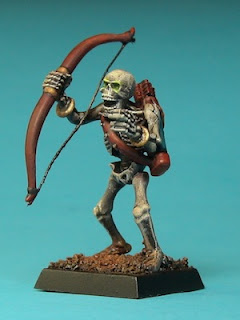
How to Paint Tomb Kings Skeleton Archer for Beginners (advanced level). Part 2
Hi all
After that, the bow and arrows we paint with Blood Red, quiver painted with Mechrite Red, and the inner part of the quiver with Hawk Turquoise, on base we use the drybrush method (as in the painting of the skeleton body tutorial) with Snakebite Leather. When you paint- remember that your task is not to repaint all model in a new color but to lightly cover details with your paint, leaving about 1 mm of the old color around the boundaries of painting area(s) thus creating a shadow.
After that, cover the red details with diluted 1:2 Ogryn Flesh
Bluish parts washed with Badab Black - but only on edges and crevasses . Sand on a base drybrushed with Vomit Brown.
After drying, paint 1:2 Blazing Orange on all the red parts. Bluish part of the quiver painted with diluted 1:2 Ice Blue.
After that we take diluted 1:2 Chaos Black and paint the thin lines at places where the blue meets the red (not getting out of depression and crevasses ) as well as all details are to be gilded (metallic).
The edges of the base painted with Chaos Black (or any other color you chose).
Now we need metallic paints.
All gold details are painted with Scorched Brown + Shining Gold (1:1) and after drying, washed with diluted 1:5 Devlan Mud (2 to 3 times). Then again, after drying, painted lightly with Shining Gold.
The edges of golden details are painted with Burnished Gold (1:2). Bow painted next to handle with Blood Red a red details on the quiver painted with Vomit Brown at the edges (diluted 1:3).
After drying to a diluted previously Burnished Gold we add VERY small amount of Mithril Silver (just to make golden color look more cold) and barely touch the edges of the metal parts .
The model is ready for battles but if you do decide to give it a more attractive look, you can add glowing eyes.
For this we take the following colors:
After that, dilute Catachan Green (1:3) and paint inside and on eye sockets. Give it time to dry completely - and than apply a layer of Scorpion Green on the edge of eye sockets and in to eye sockets. Let paint dry and repeat if desired. When you'll be satisfied with the "glow" make small dots inside eye sockets with Skull White diluted (1:5), the effect will be visible only after all paints will be completely dry.
Here you can see my final result
In the conclusion of the skeleton archer painting tutorial we'll see how to paint all the remaining details.
For this we use the same model as in the first part, as well as the following colors:
For this we use the same model as in the first part, as well as the following colors:
Now carefully cover the bow and arrow feathers with Dark Flesh, his quiver and strap with Scarab Red. Just another "inner" part of the cover of a quiver with Regal Blue + Hawk Turquoise (1:1) All paints should be diluted with water until the consistency of thick milk (not water). Do not even hope for covering all black primer with one layer of paint - you need approx. 3-5 layers.
Here is what I got at his stage:
Here is what I got at his stage:
After that, the bow and arrows we paint with Blood Red, quiver painted with Mechrite Red, and the inner part of the quiver with Hawk Turquoise, on base we use the drybrush method (as in the painting of the skeleton body tutorial) with Snakebite Leather. When you paint- remember that your task is not to repaint all model in a new color but to lightly cover details with your paint, leaving about 1 mm of the old color around the boundaries of painting area(s) thus creating a shadow.
After that, cover the red details with diluted 1:2 Ogryn Flesh
Bluish parts washed with Badab Black - but only on edges and crevasses . Sand on a base drybrushed with Vomit Brown.
After drying, paint 1:2 Blazing Orange on all the red parts. Bluish part of the quiver painted with diluted 1:2 Ice Blue.
After that we take diluted 1:2 Chaos Black and paint the thin lines at places where the blue meets the red (not getting out of depression and crevasses ) as well as all details are to be gilded (metallic).
The edges of the base painted with Chaos Black (or any other color you chose).
Now we need metallic paints.
All gold details are painted with Scorched Brown + Shining Gold (1:1) and after drying, washed with diluted 1:5 Devlan Mud (2 to 3 times). Then again, after drying, painted lightly with Shining Gold.
The edges of golden details are painted with Burnished Gold (1:2). Bow painted next to handle with Blood Red a red details on the quiver painted with Vomit Brown at the edges (diluted 1:3).
After drying to a diluted previously Burnished Gold we add VERY small amount of Mithril Silver (just to make golden color look more cold) and barely touch the edges of the metal parts .
For this we take the following colors:
The End
Here you can see my final result


Comments